How to Install Vagrant on Windows –Step-by-Step Guide (2025)

Hi everyone, hope you’re having a fantastic day! 😊 Today, we’re diving into the world of Vagrant — a powerful tool that makes creating and managing virtual machines on your local system a breeze. Whether you’re a developer, tester, or DevOps enthusiast, Vagrant helps you build consistent and reproducible environments with ease.
With Vagrant, you can skip the hassle of manual VM setup and dependency issues. In no time, you’ll have a fully functional virtualization environment for learning, testing, or development.
In this comprehensive guide, we’ll walk you through step-by-step instructions for installing Vagrant on Windows and setting it up for your projects. Let’s get started!
Problem Statement
Let’s talk about why Vagrant is such a useful tool.
Many times, my colleagues have asked me how they can set up an environment on their local system to learn Linux and DevOps tools like Ansible, Jenkins, and more.
Some feel that cloud platform fees are too expensive, especially for beginners who are just starting their careers. Others don’t want to deal with the hassle of downloading ISO files and manually configuring everything, fearing it might mess up their system.
They often ask me: “Is there an easier way to set up virtualization on Windows without all the complexity?”
Solution
Since the goal is to set up a virtualization environment on Windows for testing and learning purposes, Vagrant was the first tool that came to my mind. That’s why I recommended it to my colleagues.
Now, they’re asking me: “Can you guide us on how to install this on Windows?”
So, let’s walk through the installation process step by step! 🚀
What is Vagrant?
Before installing this on our Windows system, let’s take a moment to understand the tool better. Getting familiar with its features and functionality will help us use it more effectively and avoid potential setup issues. A quick overview ensures a smoother installation and a better experience.
Vagrant is an open-source utility that assists developers in building and managing light, portable, and reproducible development environments. It enables users to automate the configuration of development environments with simple configuration files, making it simpler to work on various machines without manual configuration.
This is compatible with several virtualization providers such as Virtual Box, VMware, Hyper-V, and Docker, allowing for easy environment creation. It is extensively used for development, testing, and learning DevOps tools such as Ansible, Kubernetes, and Jenkins.
Developers can use this to ensure consistency in their workflows, prevent dependency conflicts, and spin up or destroy virtual machines with ease.
This tool is designed for everyone as the easiest and fastest way to create a visualized environment!
You can go to official site here to read more about this.
Now, lets jumped to our installation process
Installing Vagrant on Windows
You can set up Vagrant on your Windows system using two simple methods:
1. Using the Executable File
The easiest way to install Vagrant is by downloading the official installer. Simply grab the .exe file from the link below and follow the installation steps.
You can get installer file from here
2. Using Chocolatey Package Manager
If you love using package managers or run into issues with the executable file, Chocolatey is a great alternative!
step 1: Install Chocolatey
Before installing Vagrant via Chocolatey, you need to set it up on your system. Run the following command in PowerShell (as Administrator) or follow the official guide here:
Set-ExecutionPolicy Bypass -Scope Process -Force; [System.Net.ServicePointManager]::SecurityProtocol = [System.Net.ServicePointManager]::SecurityProtocol -bor 3072; iex ((New-Object System.Net.WebClient).DownloadString('https://community.chocolatey.org/install.ps1'))
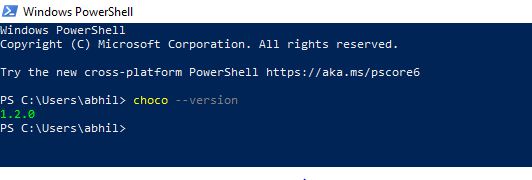
Once installed, verify Chocolatey with:
choco --version
You’ll see an output similar to the image below.
Step 2: Install Vagrant with Chocolatey
Now, install Vagrant by running:
choco install vagrant
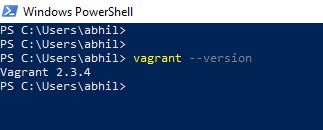
Once installed, verify it using:
vagrant --version
You’ll see an output similar to the image below.
That’s it! You’ve successfully installed Vagrant on Windows. Now you’re all set to start using it.
Conclusion
In this article, we explored two simple ways to install Vagrant on a Windows system—using the Chocolatey package manager and the official executable file. Both methods provide a seamless way to set up Vagrant, making it easier to create and manage virtual environments for development, testing, and learning.
For those who prefer a more hands-on walk through, I’ve also created a detailed YouTube video covering the entire installation process step by step. You can watch it to follow along visually and ensure a smooth setup experience.
What’s Next?
Now that Vagrant is installed, the next step is to set up a virtualization environment on your local Windows machine. In upcoming articles, we’ll dive deeper into configuring Vagrant boxes, managing virtual machines, and automating environments using provisioning tools like Ansible. This will help you build a robust DevOps setup right on your system.
I hope you found this guide helpful! If you have any questions or need further clarification, feel free to drop a comment below or check out my YouTube video for additional guidance. Stay tuned for more tutorials, and happy learning! 🚀
💬 Get involved in the discussion! If you have questions or want to share your experience with Vagrant, drop a comment below. Your insights can help others and spark meaningful conversations in the community. Let’s learn and grow together!
Explore my other articles on DevOps and Cloud for more insights, tips, and tutorials. Stay informed and enhance your skills with practical content designed to boost your knowledge. Happy learning!