10 Must-Know Linux Networking Commands

1. Introduction
Linux networking is one of the most misunderstood areas in system engineering — not because it is complex, but because it is often taught incorrectly.
Most guides list commands. Very few explain how Linux networking commands fit into the way networking actually works.
In real systems, networking problems are rarely obvious. A slow application may not be an application issue at all. A “network down” alert may turn out to be DNS. A perfectly healthy server may still be unreachable due to routing or firewall behaviour.
This article is written to solve that gap.
Instead of memorising commands, you will learn:
- What each Linux networking command really does
- How it works at a system or protocol level
- Why and when you should use it
- How all commands fit together in a single troubleshooting flow
If you understand this article fully, you can debug most Linux networking issues in production — and explain your reasoning clearly in interviews.
2. How Linux Networking Problems Actually Occur
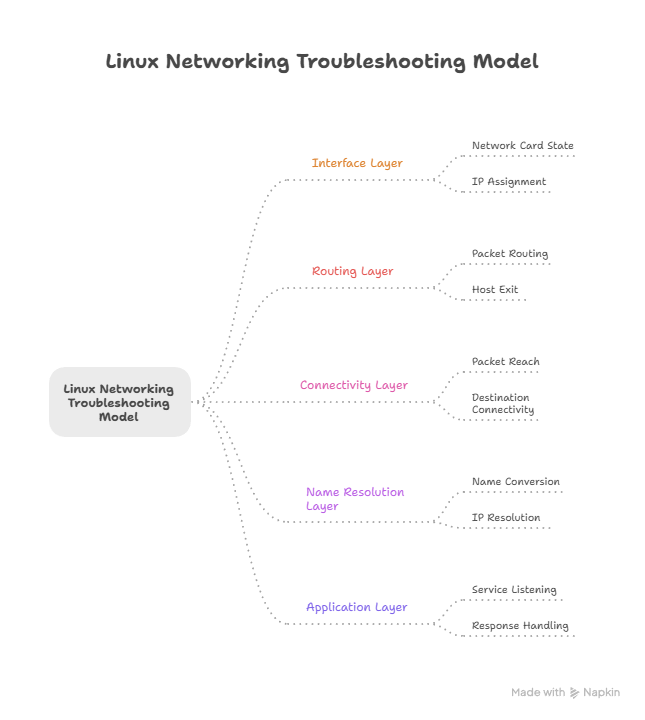
Before diving into the individual commands, let’s first spend a few minutes understanding how Linux networking works and where issues typically occur. This simple model is designed to make those problem areas easy to visualise and reason about.
Every Linux networking problem can be traced to one or more key layers:
- Interface Layer – Network card state and IP assignment
- Routing Layer – How packets leave the host
- Connectivity Layer – Whether packets reach the destination
- Name Resolution Layer – How names convert to IPs
- Application Layer – Whether services are listening and responding
Each Linux networking command targets a particular layer in this chain, so using a command meant for the wrong layer often results in confusion and unnecessary troubleshooting efforts.
This model should give you the right mindset for effective Linux network troubleshooting. Now, let’s dive into the commands.
3. Socket & Connection Inspection (Application Layer)
3.1 Socket Statistics(ss)
3.1.1 What is SS?
ss is a modern Linux utility that displays socket-level information directly from the kernel. It shows which applications are listening on which ports, which connections are established, and what state each connection is in.
3.1.2 How does it work?
ss reads data from kernel networking structures (via Netlink), which makes it:
- Faster than older tools
- More accurate
- Closer to the actual kernel state
3.1.3 Why do we use SS?
We use ss when the problem is inside the host, usually related to:
- Services not starting
- Port Conflicts
- Unexpected connection states
Example:
You encounter a scenario where you hear that ” My application is not working on port 8080″, so before running to check the config, you can run the command below command
ss -lntp | grep 8080

#If another process owns the port, the problem is already found.
3.2 netstat — Legacy Socket Tool
3.2.1 What is netstat?
netstat is an older utility that provides similar socket and routing information.
3.2.2 Why is it still relevant?
- Found on older systems
- Mentioned in interviews
- Appears in legacy scripts
3.2.3 Why should you avoid it?
- Slower
- Deprecated
- Less accurate than ss
TIP: Understand netstat, but use ss.
4. Interface, IP & Routing Inspection (Host Networking Layer)
4 IP Command
4.1 What is IP?
ip is a single command that replaces multiple legacy tools, such as:
- ifconfig
- route
- arp
It is the primary interface between you and the Linux networking stack.
4.2 How does it work?
The ip Command works by sending requests to the Linux kernel’s networking stack (via netlink) to read or modify networking objects, such as interfaces, addresses, and routes. When you run a subcommand such as ip addr, ip link, or ip route It tells the kernel what information you want or what configuration to modify, and the kernel responds with the current state or applies the requested change. Internally, ip is just a user-space frontend: it formats your options, communicates with the kernel, and then prints human-readable output showing the results of the kernel’s networking configuration.
5 Connectivity & Path Analysis (Network Layer)
ping Connectivity & Path Analysis (Network Layer)
5.1.1 What is ping?
The ping command is a basic network diagnostic tool used to test connectivity between your system and another host (IP or domain).
5.1.2 How ping works?
It works by sending ICMP Echo Request packets to the target and waiting for Echo Replies, reporting packet loss and round-trip time in milliseconds. This helps you verify if a host is reachable, measure latency, and detect network issues such as drops or high delay. Common usage is ping <host> and it typically runs until stopped with Ctrl+C, summarising statistics at the end.
5.1.3 Limitation of Ping
- It only tests basic reachability and latency, not overall bandwidth, throughput, or application-level performance.
- Many hosts or firewalls block or rate-limit ICMP, so a lack of a ping reply does not always mean the service or network is actually down.
- It uses ICMP only, so results can differ from real TCP/UDP application behaviour and cannot detect higher-layer issues like DNS or HTTP errors.
- It measures round-trip time from one point of view, giving no direct visibility into asymmetric paths or where along the route the problem occurs.
5.2 Traceroute
traceroute path discovery tool
5.2.1 What is traceroute?
In Linux, traceroute is a network diagnostic command used to show the path that packets take from your machine to a destination host (IP or domain).
5.2.2 How does it work?
It sends packets with gradually increasing Time To Live (TTL) values and listens for “time exceeded” ICMP responses from each router along the way, revealing every hop, its IP/hostname, and the round‑trip time. This helps identify where latency, packet loss, or routing issues occur between source and destination, making traceroute valuable for troubleshooting complex network problems and understanding how traffic flows across the internet.
5.2.3 Limitation of Traceroute
Traceroute has several important limitations as a diagnostic tool.
- It discovers paths at the interface level, not the true router‑level path, and load‑balanced routes can make the displayed path look inconsistent or even nonexistent.
- Many routers or firewalls de-prioritise, rate‑limit, or block probe packets (UDP/ICMP/TCP), leading to timeouts (
*) or missing hops even when traffic is actually flowing normally. - It shows where delay or loss appears, but not why (e.g., congestion vs. CPU load), and different protocols/ports can follow different paths than what traceroute reports.
5.3 My Traceroute(mtr)
mtr Continuous Path & Loss Analyser
5.3.1 What is mtr?
In Linux, mtr (My Traceroute) is a network diagnostic tool that combines the functionality of ping and traceroute to provide real‑time visibility into the path and quality of a connection between your host and a destination.
5.3.2 How mtr works?
The mtr command sends probe packets with incrementally higher Time To Live (TTL) values to map each hop along the path, much like traceroute, while simultaneously tracking latency and packet loss at every hop in the manner of ping. It refreshes these metrics continuously in an interactive display, allowing real-time monitoring. This ongoing analysis reveals dynamic problems like jitter, elevated delays, or drops at specific points over time, rather than a one-off view.
5.3.3 Limitation of mtr
The mtr command has key limitations despite its power as a diagnostic tool.
- Similar to traceroute, mtr depends on ICMP, UDP, or TCP probes that routers and firewalls often block, throttle, or downgrade, resulting in inaccurate packet loss data, absent hops (displayed as
???), or timeouts unrelated to genuine traffic patterns. - Packet loss figures may deceive because of ICMP response throttling on the return route; elevated loss at a single hop often signals no true issue unless it affects subsequent hops.
- It captures only the outbound path and latency from your viewpoint, overlooking asymmetric routes, and fails to pinpoint root causes such as congestion or issues at the application level.
6 DNS Resolution Debugging (Name Resolution Layer)
6.1 Dig command
DIG DNS Debugging Authority
6.1.1 What is the DIG command?
dig in Linux serves as a robust DNS query utility, known as “Domain Information Groper,” for retrieving records such as A, MX, NS, and TXT from DNS servers. It delivers comprehensive results covering the query domain, response times, server info, and authoritative data, proving invaluable for DNS troubleshooting, propagation checks, and zone analysis. Compared to basic tools like nslookup, dig provides versatile controls—like dig example.com MX @8.8.8.8 for custom servers, types, and formats—and comes from the BIND suite.
6.1.2 How DIG command work?
dig operates by building a DNS query packet (typically over UDP port 53) and dispatching it to a designated or default DNS server, seeking records such as A, MX, or NS for a given domain. The server replies with a formatted packet that includes the header (status info), question (original request), answer (matching records), authority (name servers), additional (glue records), and timing stats. Dig then interprets this into readable output, exposing detailed info for diagnosing resolution chains, cache problems, or propagation lags.
6.1.3 Limitation of the dig command
Limitations of the Linux dig command mainly come from what it tests (DNS) and what can interfere with DNS queries.
- Limitations of the Linux dig command mainly come from what it tests (DNS) and what can interfere with DNS queries.
- Results depend on which DNS server you query (default resolvers from
/etc/resolv.confvs a public/authoritative server), so different servers can legitimately return different answers due to caching, split-horizon DNS, or propagation delays. - Firewalls, network ACLs, or DNS server policies can block or filter DNS traffic (commonly UDP/TCP 53), causing timeouts or incomplete troubleshooting signals.
- By default, the output is very verbose and can be misread without experience (e.g., CNAME chains, authority vs answer sections), so interpretation errors are common.
6.2 nslookup
nslookup — Basic DNS Query Tool
6.2.1 What is nslookup?
nslookup (Name Server Lookup) is a command-line tool used to query DNS (Domain Name System) and get information about domains and IP addresses.
6.2.2 How nslookup works?
nslookup works by sending a DNS query from your system to a configured DNS server to resolve a domain name or IP address. The DNS server checks its cache; if the answer is not available, it performs a recursive lookup by querying root, TLD, and authoritative DNS servers. Once the correct DNS record is found, the server returns the response (such as an IP address) to nslookup, which then displays it to the user.
6.2.3 Limitation
- Provides limited DNS details compared to advanced tools like
dig - Not reliable for automation or scripting
- Offers less control over query options
- Not suitable for deep or production-level DNS troubleshooting
7. Service Reachability & Application Validation
7.1 nc (Netcat)
7.1.1 What is Netcat?
Netcat (nc) is a versatile Linux command-line networking tool used to read and write data over TCP and UDP connections. It acts as a simple network client or server, allowing users to test connectivity, transfer files, perform port scanning, and debug network services. Netcat can listen on a specific port, connect to remote ports, and send or receive raw data, making it useful for troubleshooting and learning how network protocols work. Because of its flexibility and simplicity, it is often called the “Swiss Army knife” of networking tools in Linux.
7.1.2 How Netcat works?
Netcat works by creating a direct TCP or UDP connection between two systems and sending raw data through that connection. Depending on the mode, it can either listen on a specified port as a server or initiate a connection to a remote host as a client. Once the connection is established, netcat reads data from standard input and transmits it over the network, while simultaneously displaying received data to standard output. This simple read-and-write mechanism allows it to test ports, transfer files, and debug network services.
7.1.3 Limitation of Netcat
- Lacks encryption or authentication, making data transfers insecure
- Not suitable for large or reliable file transfers
- Limited error handling and no built-in protocol awareness
- Can be misused for security attacks, so often restricted in production environments
7.2 CURL Command
curl — Application-Level Validator
7.2.1 What is the curl command?
curl is a command-line tool used to transfer data to or from a server using various network protocols. It is most commonly used to send HTTP and HTTPS requests to APIs and websites, but it also supports FTP, SFTP, SCP, SMTP, and more. With curl, you can test APIs, download or upload files, inspect HTTP headers, authenticate requests, and automate network interactions from the terminal. It is widely used in Linux and DevOps environments for debugging, scripting, and validating web services.
7.2.2 How curl works?
curl works by sending a request to a server and receiving its response using a specific protocol, usually HTTP or HTTPS. It builds the request with the required method, headers, and data, sends it over the network, and then prints or saves the server’s response.
#This command sends an HTTP GET request to example.com and displays the webpage content in the terminal.
curl https://example.com

#This fetches data from an API endpoint and shows the response.
curl -X GET https://api.github.com
7.2.3 Limitation of the CURL command
- No built-in GUI or browser rendering, only raw data output.
- Limited support for complex workflows compared to full API tools.
- Verbose syntax for advanced requests can be hard for beginners.
- Not suitable for stateful or long-running interactions without scripting.
8. Consolidated Comparison: Linux Networking Commands
This consolidated comparison summarises key Linux networking commands in a matrix format to help you quickly understand their purpose, behaviour, and limitations. Instead of learning each tool in isolation, the table highlights how commands differ in usage, protocols, strengths, and common scenarios. This side-by-side view makes it easier to choose the right command for troubleshooting, testing, or automation, especially in real-world Linux and DevOps environments where clarity and speed matter.
| Command | Layer | What It Inspects | Why It Matters |
|---|---|---|---|
ss | Application | Sockets & ports | Find port conflicts |
netstat | Application | Legacy socket info | Backward compatibility |
ip | Interface/Routing | IPs & routes | Core connectivity |
ping | Connectivity | Reachability | Quick signal |
traceroute | Network path | Route hops | Find breaks |
mtr | Network path | Loss & latency | Production debugging |
dig | DNS | DNS records | Name resolution |
nslookup | DNS | Basic lookup | Quick check |
nc | Transport | Port access | Firewall testing |
curl | Application | App response | Service validation |
9. Conclusion
Mastering Linux networking commands like ss, netstat, ip, curl, nc, dig, mtr, and traceroute helps you understand how systems actually communicate — and where they fail — in real environments. These tools matter far more in production troubleshooting and interviews than just knowing syntax.
Most interview questions aren’t about running commands — they’re about explaining failures, interpreting output, and reasoning under pressure.
If you’re preparing seriously for Linux or DevOps interviews, I’ve compiled real-world Linux failure scenarios (networking, permissions, logs) with interview-ready explanations to help you prepare more effectively and efficiently.
This bundle is for candidates preparing for Linux SysAdmin, DevOps, or SRE interviews.
👉 View the Linux Interview Bundle on Gumroad
Built from real production issues, not textbook examples.