10 Powerful Terraform State Commands That Will Save You Hours!
1. Introduction
Terraform state commands are essential in debugging, changing, and managing infrastructure in an efficient manner. They enable users to examine the existing state of resources, update configurations manually, and even delete stale entries if need be. For instance, terraform state list assists in highlighting all managed resources, while terraform state show gives detailed attributes of a given resource. If a resource becomes orphaned or misconfigured, terraform state rm can be utilized to safely delete it from the state file. Moreover, terraform state mv assists in renaming or relocating resources in the configuration without re-creating them. These commands provide more control, debugging, and infrastructure stability.
In this blog, we’ll explore the most widely used Terraform state commands in detail, so stay with me.
2. Understanding Terraform State Commands
2.1 What are Terraform state commands?
Terraform state commands are a collection of commands used to manage, view, and update Terraform’s state file so that it can track infrastructure correctly. With these commands, users can access the state file to debug, rename resources, or delete old entries. For instance, terraform state list lists all managed resources, and terraform state show shows information about a given resource. terraform state rm deletes resources from the state file but not in the cloud, and terraform state mv assists in renaming or moving resources. These are critical for keeping things consistent, debugging issues, and dealing with infrastructure in an efficient manner.
2.2 When and why should you use them?
Use Terraform state commands when troubleshooting and managing infrastructure to verify accuracy and consistency within the state file. They are useful in situations such as renaming resources, debugging, or fixing drift when infrastructure is changed outside of Terraform. For instance, if a resource is manually deleted but is still listed in the state file, terraform state rm can be used to delete it. If a resource must be renamed or relocated between configurations, terraform state mv ensures continuity. These commands are critical to effectively managing infrastructure, avoiding mistakes, and keeping Terraform up to date with deployed resources.
3. Most Powerful Terraform State Commands
3.1 terraform state list – View All Tracked Resources
Terraform offers a strong command, terraform state list, to show all resources being tracked in the state file. The command assists users in easily determining existing infrastructure, debugging problems, and ensuring Terraform is controlling the anticipated resources. By listing the contents of the state, teams can debug misconfigurations and maintain consistency between Terraform’s configuration and the real infrastructure.
Example Usage
terraform state list
#example output
aws_instance.web_server
aws_s3_bucket.my_bucket
aws_vpc.main
This output shows the resources Terraform manages, helping users confirm infrastructure status and track potential issues efficiently.
3.2 terraform state show – Inspect a Specific Resource
Terraform provides the terraform state show command to display detailed information about a specific resource stored in the state file. This is useful for troubleshooting, verifying configurations, and understanding the current attributes of a resource without needing direct access to the cloud provider. By using this command, DevOps engineers can inspect resource properties and detect any discrepancies between the state file and actual infrastructure.
syntax
terraform state show <resource_address> # <resource_address>: The Terraform address of the resource you want to inspect.
Example
terraform state show aws_instance.web_server
# aws_instance.web_server:
resource "aws_instance" "web_server" {
  ami                  = "ami-12345678"
  instance_type        = "t2.micro"
  availability_zone    = "us-east-1a"
  subnet_id           = "subnet-0abcd1234"
  security_groups      = ["default"]
  public_ip           = "3.15.45.23"
}
This output provides a full view of the resource’s attributes, helping users validate configurations and debug any issues efficiently.
3.3 terraform state mv – Move Resources Within State
The terraform state mv command enables you to relocate resources inside the Terraform state file. This is convenient when refactoring Terraform configuration, renaming resources, or rebasing modules with the intent to keep the resource without having it recreated. By using this command, Terraform keeps the real-world infrastructure-to-state file mapping intact and prevents unnecessary recreation and destruction of resources.
syntax
terraform state mv <source> <destination>
#<source>: The current address of the resource in the Terraform state file.
#<destination>: The new address where the resource should be moved.
Example
If an AWS EC2 instance needs to be moved from one module to another, use:
terraform state mv aws_instance.web_server module.new_module.aws_instance.web_server
Example Output:
Move "aws_instance.web_server" to "module.new_module.aws_instance.web_server"
Successfully moved 1 object(s).
This ensures that the resource remains unchanged in the cloud provider but is now tracked under the new module in Terraform’s state file.
3.4 terraform state rm – Remove Resources from State
The terraform state rm command is invoked to delete resources from the Terraform state file. This can be helpful if you need to prevent Terraform from managing a particular resource while keeping the resource in place within the actual infrastructure. By deleting a resource from the state file, Terraform will no longer monitor or manage it, something that is frequently done when transitioning resources to a different system or manually managing resources outside of Terraform.
Syntax:
terraform state rm <resource>
#<resource>: The address of the resource to be removed from the Terraform state file.
Example Usage:
If you want to remove an AWS EC2 instance from the Terraform state file, use:
terraform state rm aws_instance.web_server
Example output:
Successfully removed "aws_instance.web_server" from state
After running this command, Terraform will no longer manage the aws_instance.web_server resource, but it will still exist in AWS. If you plan to import this resource back into Terraform later, you can do so using terraform import (we will checkout this in a while.)
3.5 terraform refresh – Sync the State File with Real Infrastructure
The terraform refresh command is employed to synchronize the Terraform state file with the actual infrastructure. The command asks the infrastructure providers to refresh the state file with any change that has been made directly to the infrastructure and which Terraform might not have recorded, e.g., updates done manually or outside of Terraform. This is particularly useful when you find yourself believing that the state file is no longer in sync with the actual infrastructure.
Syntax:
terraform refreshExample:
If you want to sync the state file with the current configuration of all resources in your infrastructure, simply run:
terraform refresh
Upon executing this command, Terraform will refresh the state file to the current state of the resources so that it matches the live environment correctly. This prevents mismatches and gives a real-time view of the environment.
3.6 terraform import – Import Existing Infrastructure
Use terraform import command to pull infrastructure that is currently existing into Terraform control. This command permits you to import resources created elsewhere outside of Terraform or resources you need to begin controlling using Terraform. By importing infrastructure, you will be able to control it through Terraform without having to create it again from the start.
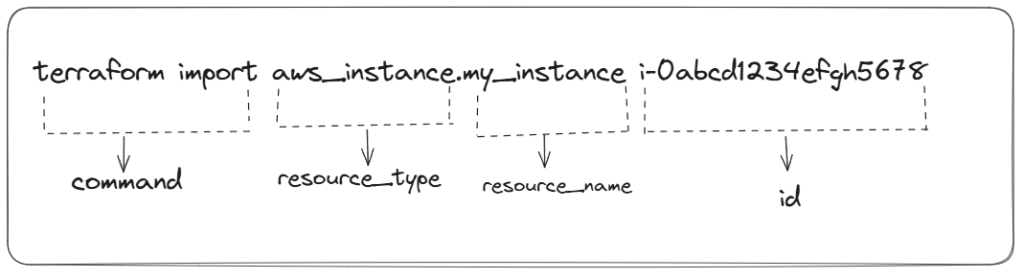
Syntax:
terraform import <resource_type>.<resource_name> <id>
now let’s decode above syntax
<resource_type>: The type of resource (e.g.,aws_instance,azurerm_virtual_machine).<resource_name>:The name you want to assign to the resource in your Terraform configuration.<id>:The unique identifier of the resource in the cloud provider’s API.
Example Usage:
If you want to import an AWS EC2 instance into Terraform, you would use the following command:
terraform import aws_instance.my_instance i-0abcd1234efgh5678
After the import is successful, Terraform will generate the resource’s configuration block, but you will need to manually write the configuration in your .tf files to match the imported infrastructure. This allows you to take full control of the resource with Terraform without disrupting its current state.
3.7 terraform output – Retrieve Outputs from State
The terraform output command is utilized to fetch values saved in the Terraform state file. These values are usually declared in the outputs.tf file and may include data like public IP addresses, database connection strings, and other relevant details required for integration with other systems or applications.
Syntax:
terraform output [output_name]
#[output_name] (optional): If specified, retrieves the value of a specific output variable. If omitted, it lists all available outputs.The terraform state pull command fetches the current Terraform state file from the backend and prints it out in JSON form. It comes in handy to look at the present state, debug, and take backups before modifying anything.
Example Usage:
If you have an output variable defined in outputs.tf that stores the public IP address of an AWS EC2 instance.
output "instance_public_ip" {
  description = "Public IP of the EC2 instance"
  value       = aws_instance.my_instance.public_ip
}
To fetch this value from the Terraform state file, run
terraform output instance_public_ip
output of the above command is : instance_public_ip = "3.125.45.78"
This command is particularly useful for
- Sharing critical data like IP addresses and database URLs with other teams.
- Integrating Terraform outputs into CI/CD pipelines.
- Quickly accessing key infrastructure details without manually checking cloud provider consoles.
3.8 terraform state pull – Download the Current State File
The terraform state pull command fetches the current Terraform state file from the backend and prints it out in JSON form. It comes in handy to look at the present state, debug, and take backups before modifying anything.
Syntax
terraform state pullExample Usage
To download and view the latest Terraform state file, run
terraform state pull > terraform-state-backup.json
This command saves the state file as terraform-state-backup.json, allowing you to manually inspect or restore it if needed.
Use Cases of terraform state pull
- Backup before changes: Ensures a copy of the latest state is available before applying modifications.
- Debugging and validation: Helps in verifying if Terraform’s state aligns with the actual cloud infrastructure.
- Manual state recovery: If the remote state is lost or corrupted, a pulled state file can be restored using
terraform state push.
3.9 terraform state push – Manually Update the Remote State File
The terraform state push command enables you to upload a local state file to the remote backend manually. It comes in handy when restoring an earlier state, recovering from corrupted states, or synchronizing changes between remote and local environments.
Syntax
terraform state push <state-file>
Example Usage
To push a previously downloaded or modified state file (terraform-state-backup.json) to the remote backend, run
terraform state push terraform-state-backup.json
Once command is executed you will see output like below one.Successfully uploaded state file!
Now, let’s see use cases of this command
- State recovery: If the remote state file is lost or corrupted, pushing a backup state file can restore Terraform’s tracking of resources.
- Manual synchronization: When working across multiple environments,
terraform state pushensures the latest state is stored in the remote backend. - Disaster recovery: If Terraform fails to update the remote state due to a network failure, pushing a correct state file prevents configuration mismatches.
⚠️ Caution:
terraform state pushcommand overrides the existing remote state, so always ensure the state file being pushed is correct and up-to-date to avoid accidental infrastructure mismatches.
3.10 terraform workspace – Manage Multiple Environments
The terraform workspace command lets you have several environments (development, staging, and production) in a single Terraform setup. Workspaces let you have different state files for every environment so that you do not get resource conflicts or unintentional changes. Rather than having separate Terraform directories or manually managing state files, workspaces give you a good mechanism to have infrastructure differences with a consistent codebase.
Syntax
terraform workspace <subcommand> [options]Common Subcommands:
1. Create a new workspace
terraform workspace new <workspace_name>
#Example: terraform workspace new staging
2. List available workspaces
terraform workspace list
#example output: default
*staging   ## The asterisk () indicates the currently active workspace.*
production
3. Switch to a different workspace
terraform workspace select <workspace_name>
# Example: terraform workspace select production
4. Show the current workspace
terraform workspace show
Key Benefits of Using Workspaces
- Environment Isolation: Separate state files prevent cross-environment interference.
- Simplified State Management: Eliminates the need for multiple backend configurations.
- Scalability: Easily manage multiple infrastructure variations without duplicating code.
⚠️ Note: Workspaces primarily affect Terraform state, not the actual configuration files. Ensure proper environment-specific variable management when using workspaces.
4. Conclusion
Learning Terraform state commands is critical to effective infrastructure management. They debug, move or destroy resources, synchronize state files, and import infrastructure. With effective use of them, teams save time, avoid errors, and maintain consistency across deployments. Automating state management using best practices such as remote state storage and state locking improves reliability further. From scaling infrastructure to troubleshooting issues or workflow optimization, familiarizing oneself with and utilizing these commands gives DevOps teams the power to retain control and effectiveness in their Terraform implementations. Taking the time to learn these tools will simplify operations and enhance overall infrastructure reliability.
Correct state file management is essential to ensure secure and efficient Terraform operations. By adhering to best practices like remote state storage, state locking, encrypting state files, and access restriction using IAM policies, you can avoid data loss and unwanted changes. Always refrain from version-controlling terraform.tfstate and making regular backups for recovery. To explore further about these best practices and understand how to apply them, read my in-depth blog on Terraform state management. Adhering to these principles will assist you in having a secure, reliable, and scalable infrastructure with Terraform.
Next Step
Now that you have a solid understanding of Terraform state commands, it’s time to put your knowledge into practice. Start applying what you’ve learned by working on real-world projects. Here are some great starting points to help you get hands-on experience.
- Migrate Local State to Remote Backend – Enable collaboration and prevent data loss.
- Implement State Locking – Avoid concurrent modifications and enhance security.
- Automate State Management with CI/CD – Ensure consistency and efficiency.
We’d love to hear from you! Share your Terraform experiences, challenges, or insights in the comments, and let’s continue the conversation on mastering Infrastructure as Code.
Explore my other articles on DevOps and Cloud for more insights, tips, and tutorials. Stay informed and enhance your skills with practical content designed to boost your knowledge. Happy learning!